


Filter Photography by Alex Mustard
Filter Photography
by Alex Mustard
MAGIC HAPPENS
Exactly 10 years ago, almost to the day, I was in the Red Sea with a mad plan. I wanted to take a colourful image of the famous stern of the Giannis D. The composition was a classic. The wreck’s rear end is exactly the right size for a vertical fisheye shot and we’d been shooting her that way since she crashed into the reef in the 1980s.
But the picture had always been monochrome blue. Being too big and far away to light with strobes. I wanted a more colourful version and I had tried on my previous visit to the Red Sea, using just manual white balance to restore the colours. Software in these days was very basic, and there was no such thing as white balance sliders in Lightroom (in fact Lightroom was still two years away) the only white balance you could use is what was recorded in the camera at the time of shooting! So I took endless photos of the wreck, all with slightly different white balance values. I could get colour of the wreck but the white balance was also sucking away the blue colour of the water too. I realized I needed a filter.
Filters are not new in underwater photography. They were popular in the early days when strobes were both unreliable and potentially dangerous. But their inflexibility on film severely limited their use. Using them in combination with white balance promised. The problem was that nobody made a filter for fisheye lenses, the one lens a stills photographer most wants to use a filter with. So I designed my own, by sandwiching three different gel filters together and sticking them to the back of my lens.
To hedge my bets I actually made up two different recipes, giving my less favoured design to my buddy Peter Rowlands to test. Post dive my shots were again too washed out, but Peter’s were amazing. Fortunately we dived the wreck again on the following day, and with a small modification to Peter’s recipe I took the first photographs of the whole stern in full colour. Well apart from Peter’s shots from the day before!
The trip was one with friends from the British Society of Underwater Photographers, everyone was very excited by the new shots, and over the week everyone who had a digital camera had tried it. The talented bunch producing amazing, strobe free, colourful images of wrecks, coral seascapes and schools of fish. Far more uses than I had ever imagined. They also implored me not to keep the filter to myself and, with a financial nudge from Peter Rowlands (I was a very poor underwater photographer at the time), by August 2005 we were selling Magic Filters. Andi Voeltz wrote the PADI Digital Underwater Photography course based on the techniques we shared, and photographers around the world used them, winning competitions and snaring magazine covers. Ten years on they are still helping photographers all around the world produce new types of images and video.
FILTER TECHNIQUE
It is important to consider filters as an alternative to shooting with strobes, not a replacement. Like any technique, they are about adding another option to our arsenal of skills. Something we should use with suitable subject matter, in suitable conditions. The best subjects for filters are coral gardens, divers, wrecks, big animals and schools of fish. Filters work best on sunny days, when there is lots of light, although now that most cameras perform very well at medium and high ISOs, they can be used in far more conditions than in the early days. That said filter photography works best when shallower than 15m, although with less colourful subjects, like wrecks, we can push this a little deeper (the Giannis D is in about 18-20m of water).
The real key to shooting successfully with filters is to appreciate it is completely different to shooting wide angle with strobes. With filters the golden rule is to always shoot with the sun on our back, so it comes over our shoulder and illuminates the subject. The direction of light must be our first thought before every shot. This means we cannot shoot every angle on each dive and we may need to dive a static subject, like a wreck, at different times of day to get the perfect shot of every feature of interest.
Avoid taking filter shots towards the light or the surface, which will leave subject matter silhouetted without colour or detail and will also over expose, or white-out, the surface. With very wide lenses, like fisheyes, we may find that a slightly downward camera angle gives the best results.
Although we can now can set white balance in post, we get noticeably better results if we set the camera’s white balance manually underwater and only tweak it in post production. This is because RAW files are not really as raw as we sometimes like to think. Big adjustments to white balance in post do create noise and reduce the range of colours in a RAW file. We avoid these issues when right white balance (or close to it) is locked into the file at the time of shooting (meaning only minor changes in post processing).
It is also worth shooting RAW + JPG with filters as many cameras process this type of images much better than third party software like Adobe Lightroom can. This is especially true of Canon cameras, which can add much more “tint” in camera, than can be added within the limits of Lightroom. Setting the white balance manually causes concerns amongst SLR shooters, in particular. Compact shooters are often more used to this technique and surely smirk at the fuss SLR photographers make! The key is to practice on land (with the camera in the housing) so you get used to the procedure for setting it. This does vary between cameras.
Underwater we can set white balance against a white slate or grey card, but most of the time a neutral coloured section of reef or wreck is fine. As long as it is done at the same depth as the subject. Common problems that cause trouble in setting white balance are when the camera is under exposing the white balance target, the target is in shadow, or we are too deep. Sometimes filter shots can look a bit flat on the LCD screen underwater. I have had photographers show me their filter shots after a dive disappointed that they could not get the filter and white balance working. But when they see the images again at the surface they are really pleased. So whatever happens keep shooting – white balance can always be corrected in post, if needs be!
FILTER ART
The most exciting thing about filters for photographers is that filter photography adds colour to images in a different way to shooting with strobes and the best filter images are usually the ones that just can’t be replicated with strobes. The question I get asked a lot is what is the advantage of using a filter, compared with just using the camera’s manual white balance alone. When you are very shallow, just below the surface, in the top 2-3m (6-9ft) then white balance alone is absolutely fine. However, once you are deeper than 3m (9ft) the advantages of a filter become increasingly apparent.
The main advantages are more subtle variations of the colour, and most noticeable, that the foreground is set against a rich blue background. Many photos taken with manual white balance are characterized with a washed out background water colour. A strong blue background is an important aesthetic element in an underwater photograph. Ask anyone what colour the sea is and they will tell you it is blue!
Finally, there is the hidden pleasure of filter photography to enjoy: leaving your strobes on the boat and enjoying the freedom of a manoeuvrable and compact rig. Ahh, the joy of being a diver! But the message I want to end with is the most important factor when using filters is to shoot with the light. Pay attention to how the sun is lighting the scene. It must be coming from behind us lighting up the subject. Driving home this lesson is the hidden reward of filter photography. I am convinced that my wide angle strobe photography underwater improved dramatically when the discipline of shooting filters taught me to pay proper attention to ambient light underwater.
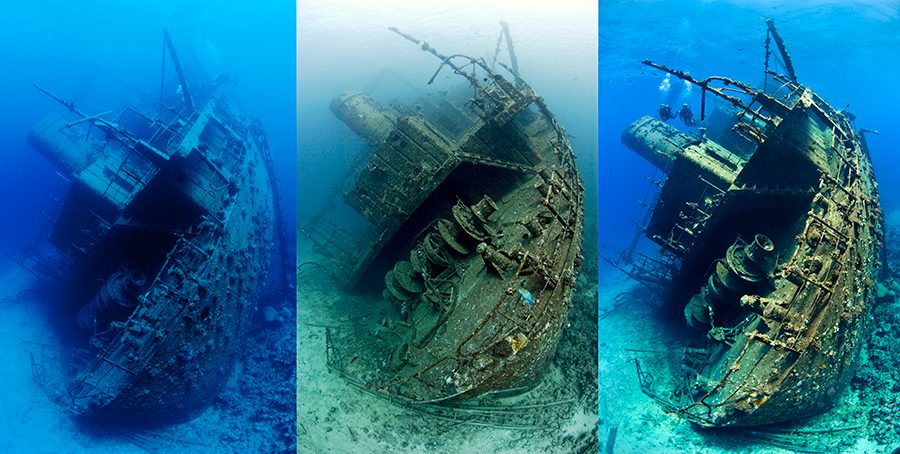
Wreck of the Giannis D, Abu Nuhas, Red Sea
1) These three photos compare a film shot of the stern of the Giannis D wreck (left), with two digital photos taken with the same camera, one using just manual white balance (centre) and one using manual white balance and a Magic Filter (right). Both white balanced images restore colour to the wreck, but the filter also helps hold a richer blue background.
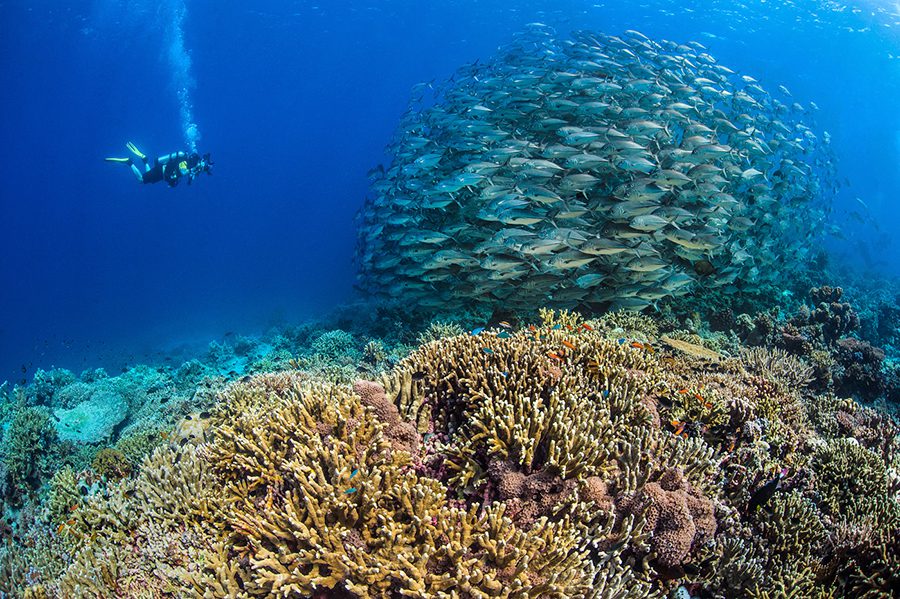
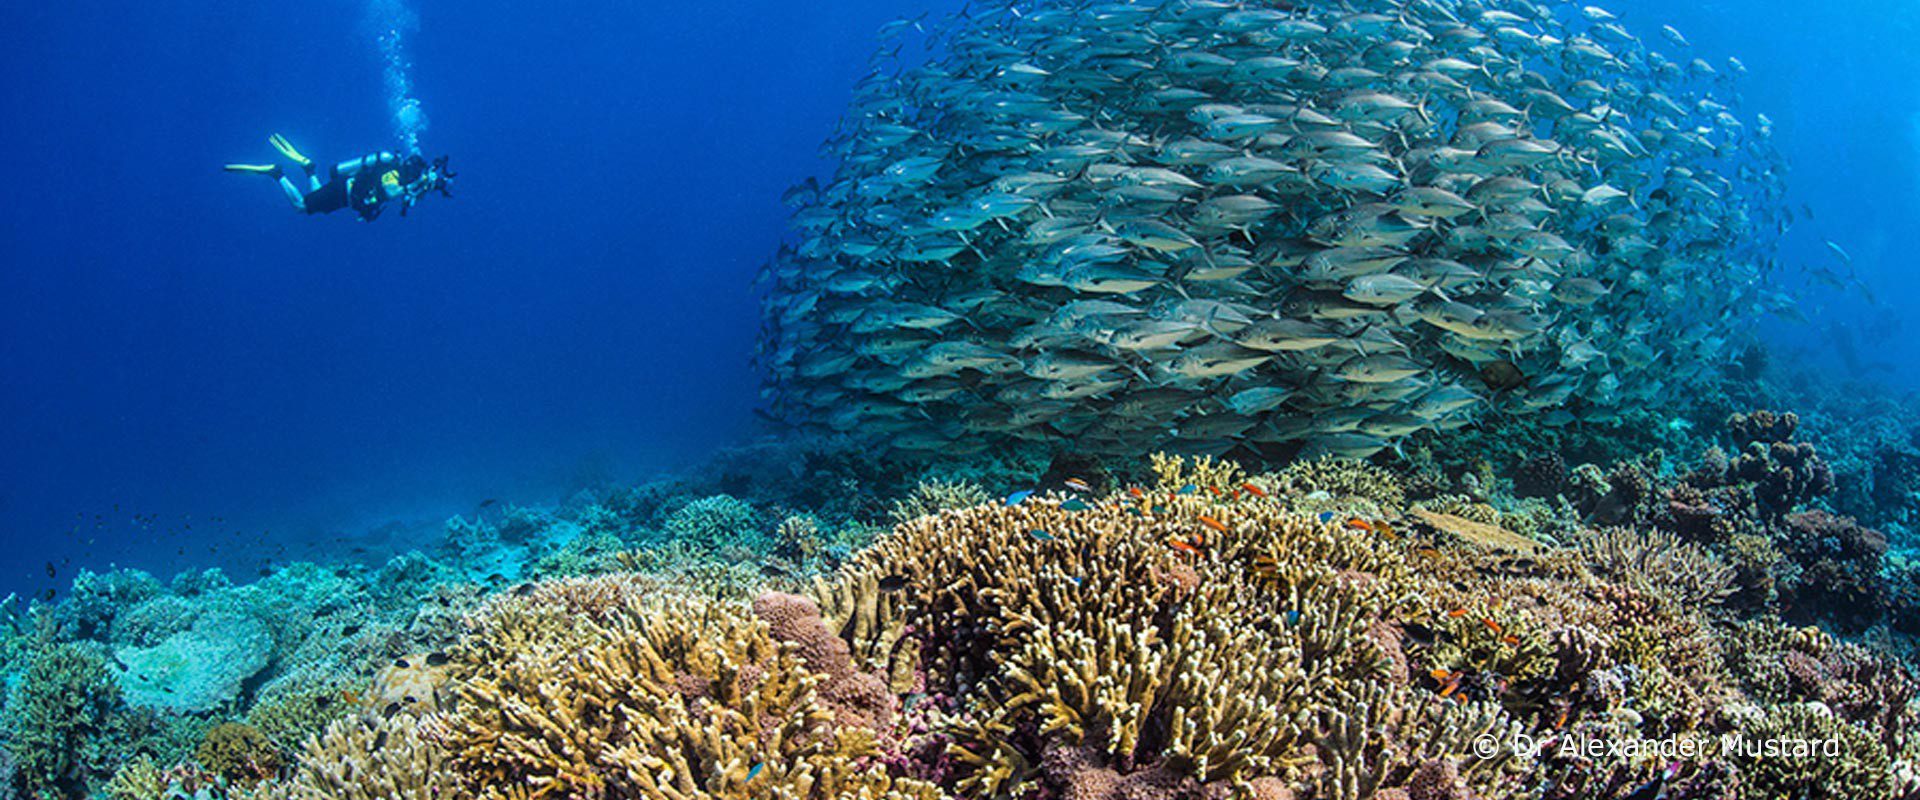
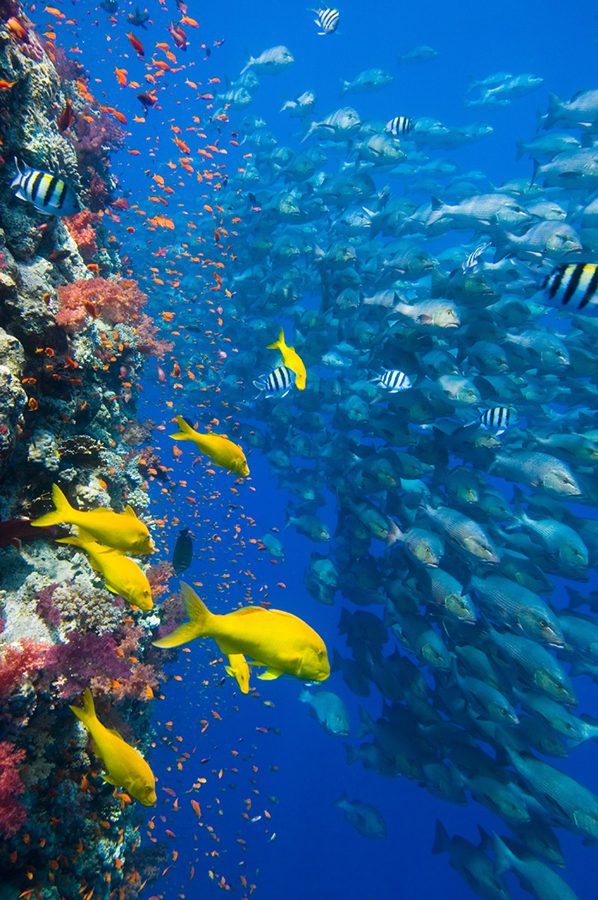
Diver Photographs Jacks. Philippines
2) Filters are excellent for shooting large scenes in full colour, such as Chris Bernhard photographing this school of jacks over a coral garden.
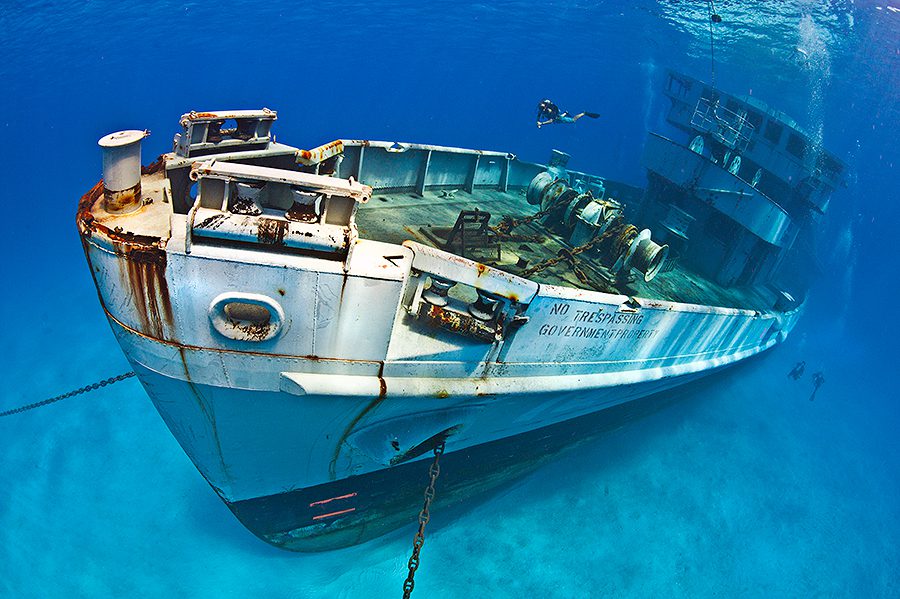
Diver and bow of the USS Kittiwake. Cayman Islands.
3) Wrecks are highly suited to filter photography. The Kittiwake wreck in Grand Cayman was bright white when she was first sank, which made setting the white balance very easy.
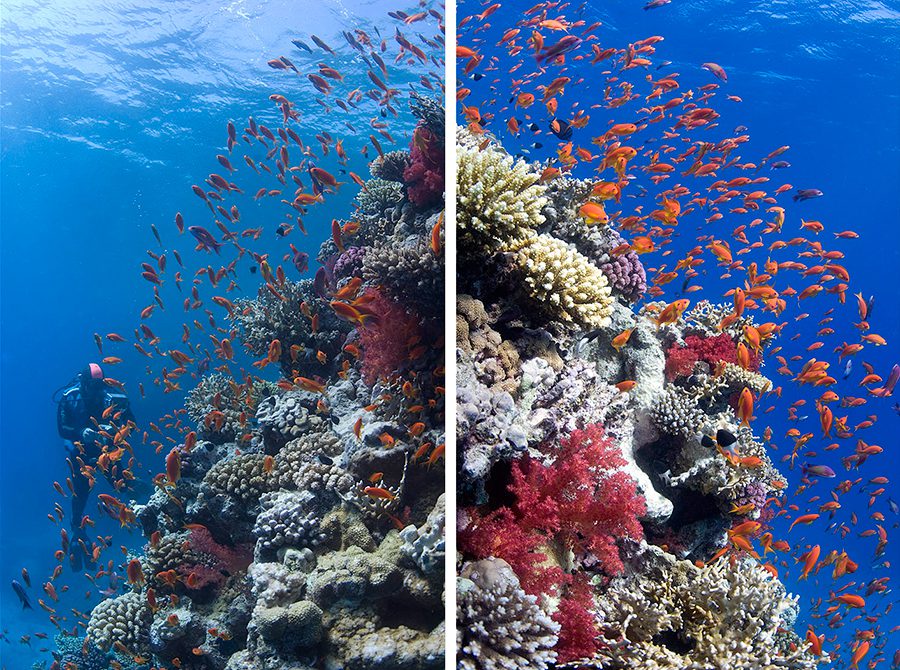
The Golden Rule
4) The golden rule of filter photography is to pay attention to the direction of light and to shoot with it coming over your shoulder onto the subject. These two photos were taken at the same time and the same depth. Left was against the light and colours are poor and blue is weak. Right was with the light and colours are intense and the blue is strong.
5) This video clip shows me shooting with the filter on a shallow coral reef in the Red Sea: Video
6) Filters are an alternative, not a replacement for strobes. And always worth having with you. They have saved many a photographer’s trip when strobes have gone wrong.
Dr Alexander Mustard is an award winning underwater photographer, whose work is published and exhibited widely. His 2007 book, Reef Revealed, featured many images from the Bird’s Head Seascape and was named the World’s best book of underwater photography. In 2008, one of his photos was used on the Raja Ampat marine park tag. Still enchanted by the region, he made three charters in 2014 alone. In Raja Ampat he is the only person to have dived in traditional Dutch clog fins and has crossed the equator underwater!